The run was a huge sucess. Thanks Kevin for such a great write up about the Manteno Veteran home.
08-20-2009 05:16 AM
ItalynStylion
Re: THE DIYMA R12 Home Audio Subwoofer
Quote:
Originally Posted by ryan s
Edit: Can anyone else see the hyperlink to DIYMA on the first word of this post? Wtf?
Yeah, I don't know what that's about....very odd
08-20-2009 05:15 AM
ItalynStylion
Re: THE DIYMA R12 Home Audio Subwoofer
Quote:
Originally Posted by JaguarDoc504
I have an extra DIYMA 12, that i am going to build a HT, or 2.1 sub for. Still trying to work out the design details. But i def. want to be able to show off the beautiful motor structure. Plus gotta have a high WAF
This def gives me some ideas..... hope u dont mind
Not at all, that's why I posted it! If you need any help with the logistics of how to get something like that done let me know.
08-19-2009 03:09 PM
JaguarDoc504
Re: THE DIYMA R12 Home Audio Subwoofer
I have an extra DIYMA 12, that i am going to build a HT, or 2.1 sub for. Still trying to work out the design details. But i def. want to be able to show off the beautiful motor structure. Plus gotta have a high WAF
This def gives me some ideas..... hope u dont mind
08-17-2009 04:29 AM
ItalynStylion
Re: THE DIYMA R12 Home Audio Subwoofer
It was an idea that Zach (Boostedrex) on DIYMA kinda got stuck in my head. He said jokingly, something about using solid core coper for wiring and I took it to the extreme. When I saw the DIYMA R12 in person I knew it's motor structure was too pretty to hide. It took me WEEKS to figure out how I was going to show off the magnet, keep the inside of the box functional but presentable, and not show wires. Then one day it just all fell into place.
08-17-2009 03:07 AM
Diru
Re: THE DIYMA R12 Home Audio Subwoofer
that is cool looking using the hard copper line
08-16-2009 09:16 PM
ItalynStylion
Re: THE DIYMA R12 Home Audio Subwoofer
After some primer and more sanding I did a coat of paint. Let me first admit that I suuuuuuuuuck at painting and I loath it. But, this time I was using some foam paint rollers that worked well. I wanted a smooth finish but yeah...that didn't happen. What did happen was actually even cooler. The rollers left a sort of texture that I ended up liking quite a bit. The second picture is with the paint dry after two coats.
After the paint had dried I connected the amp wires to the copper leads and mounted the amp. More threaded inserts were used. Check out the vent at the top. I think it came well.
I couldn't use plolyfill on this box since you could see into it. This meant that I was going to use some acoustic foam that Mir and I had ordered last summer. All walls except for the plexiglass (for obvious reasons) were lined with the foam. I used carpet tape which is my newest favorite toy. It's like duct tape that is double sided. It's strong as hell and keeps two things stuck together flush. Pretty cool stuff! It was perfect for what I wanted to do and I'm glad it was suggested to me.
Now with everything finished all I had to do was pop the sub in and seal up the glass top. I used speaker gasketing tape on the plexiglass because I refuse to build a leaky box.
Here she is all finished up!
08-16-2009 09:15 PM
ItalynStylion
Re: THE DIYMA R12 Home Audio Subwoofer
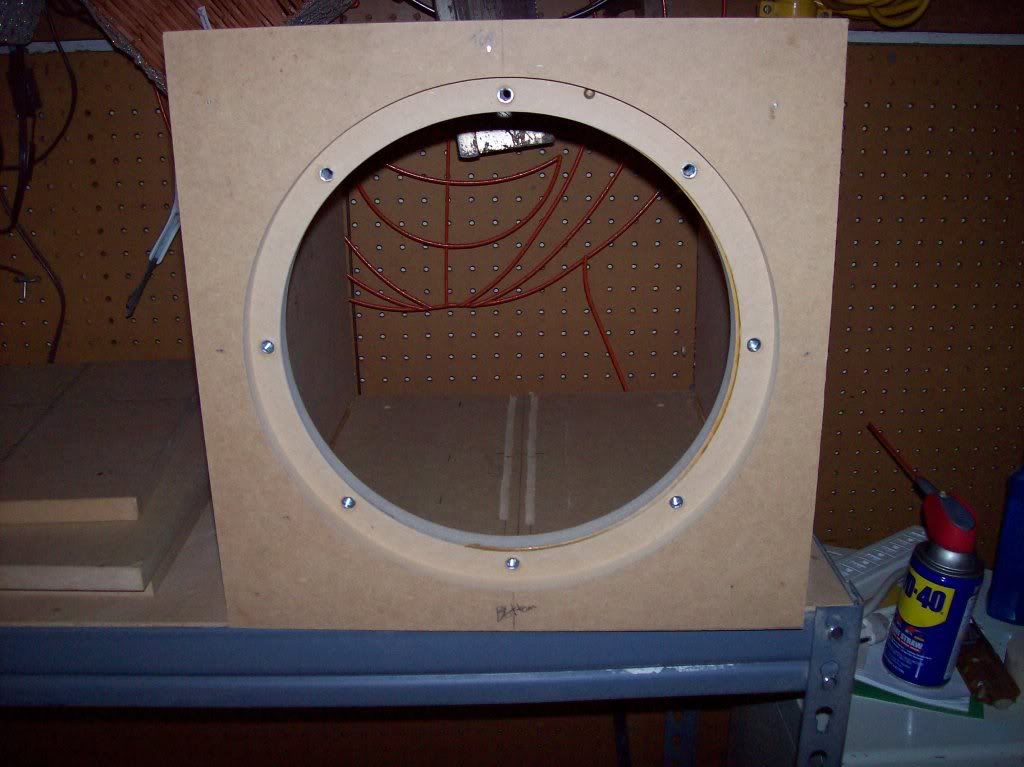
Here is the box with the top being test fitted. You can see here how big the window will be. At this point in the build stage I had to build the rest of the box around the copper so I couldn't remove it. I decided to cover it with a bag so it wouldn't get junk on it. Note the threaded inserts used here. I freakin love these things.
Here is the rear compartment where the amp will mount. I drilled some holes in the bottom of the compartment so air could flow up through the bottom and out the top vent that I had made. Here is where I terminated the copper leads too so they could be connected to the amp.
Here is the box after some round overs and some sanding.
08-16-2009 09:14 PM
ItalynStylion
THE DIYMA R12 Home Audio Subwoofer
Some of you might remember that I was planning on building a home theater setup for a frend of mine that just got married as a wedding gift. He's basically paying for material costs and I'm building it all. We wanted to keep it somewhat frugal but still wanted an audiophile sound as well. I always like to make things look nice too when it doesn't get in the way of functionality.
I had bought a DIYMA R12 a few months ago and it was the PERFECT candidate for this project. This was my first application for the DIYMA sub and I wanted it to be special. I think I got my wish because the final product really brings a smile to my face.
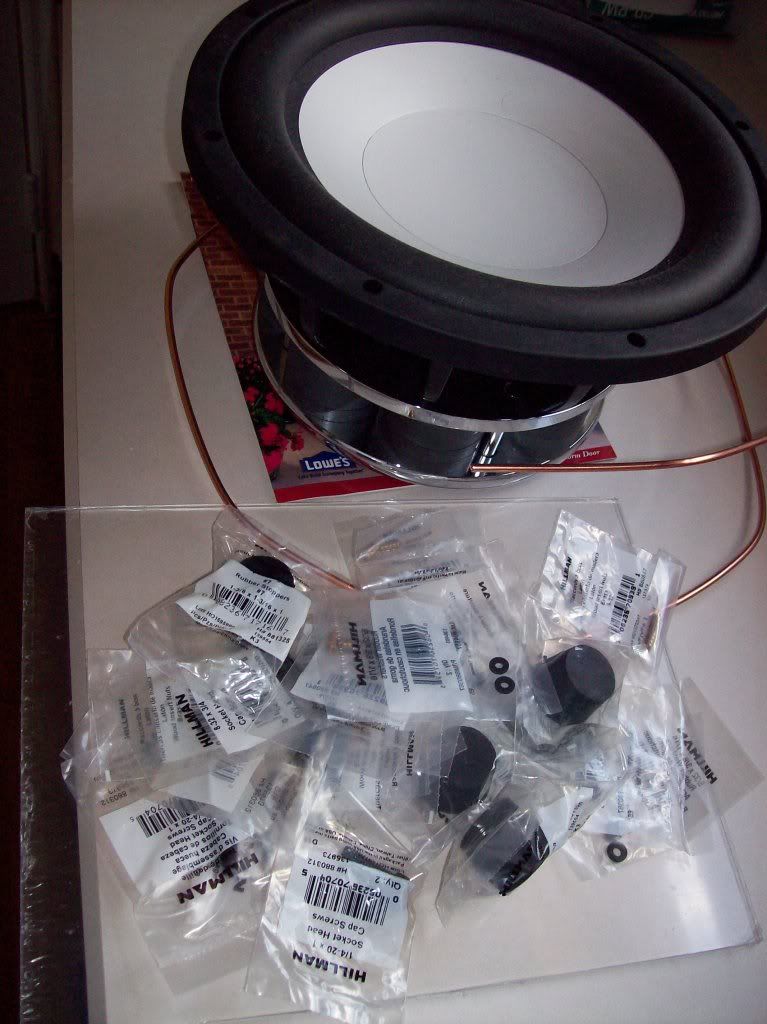
Here is what we are starting with. The DIYMA sub, a pile of hardware, solid 4ga copper and not shown is an ED LT550 plate amp and a pile of wood.
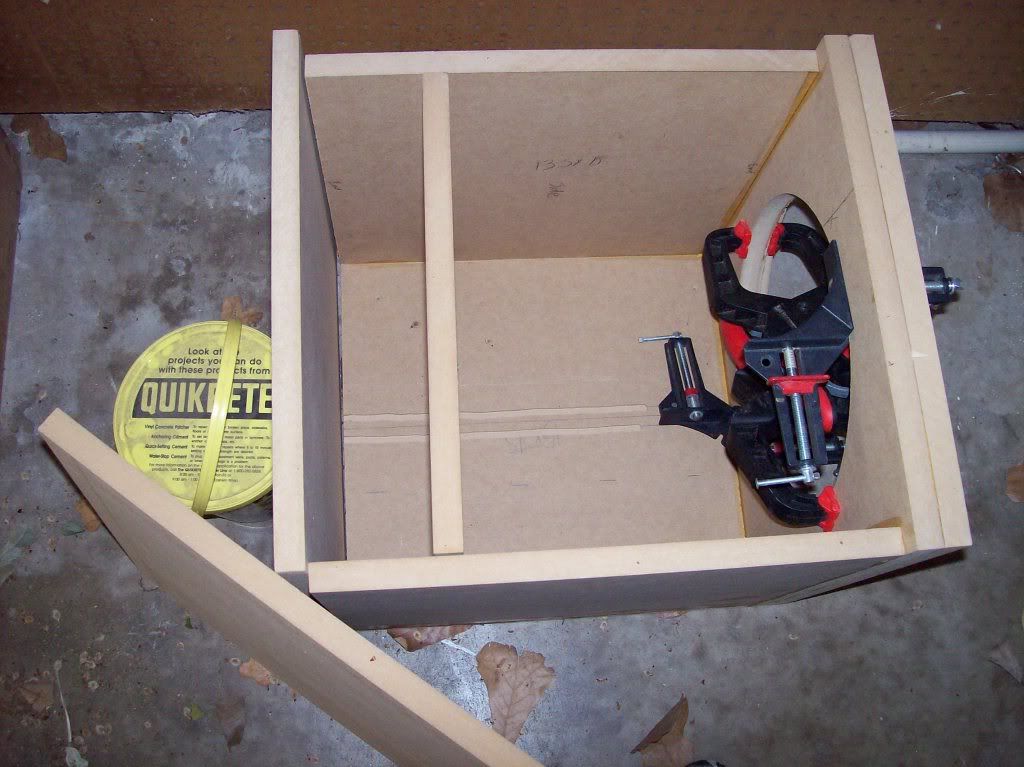
Here is my quick mock up while clamping the front baffle. Let me take a moment to explain my deign. The sub mounts to the front double baffle and is countersunk to be flush with the front. The small chamber on the left side in the picture below is for the plate amp. I didn't want to have the amp in the subs' airspace because I don't want to compromise a side of the box by cutting out the wall for the amp. Also, I wanted to let this amp breathe and cool off which posed a problem since the heatsink is on the INSIDE of the amp...retarded I know. I'll show you how I accomplished this in a bit. Lastly, the DIYMA motor structure is too beautiful too hide so I'll be using a plexiglass window on the top to allow it to be seen.
I'm all about the threaded inserts now. These things are waaaay better than T-nuts!
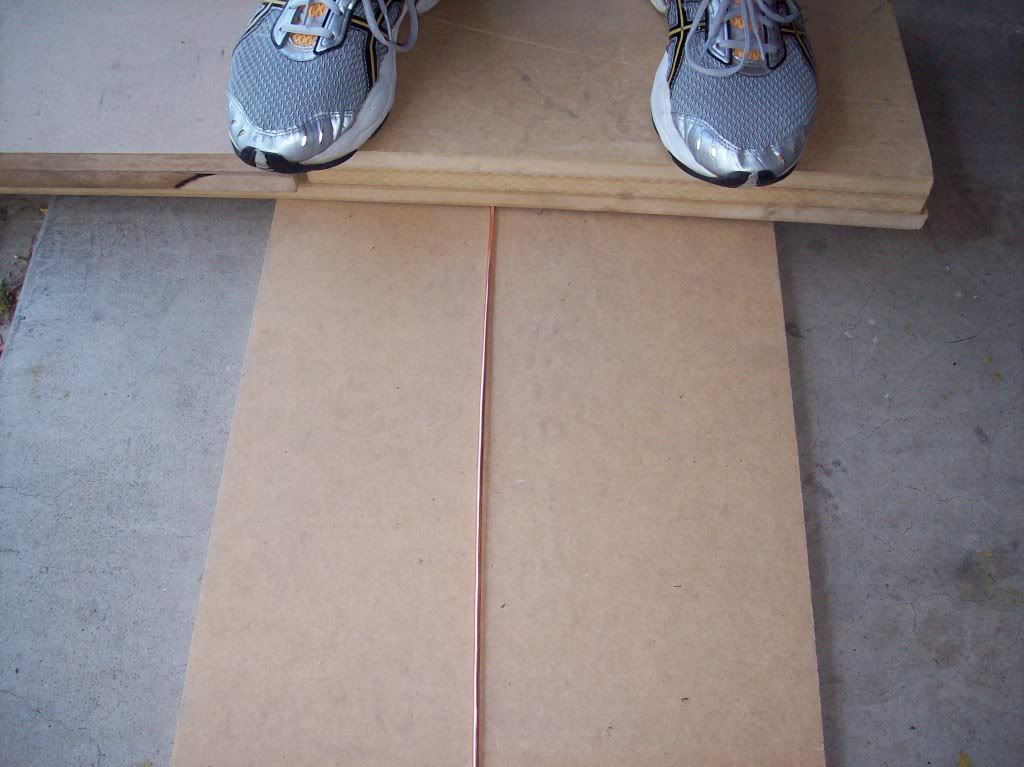
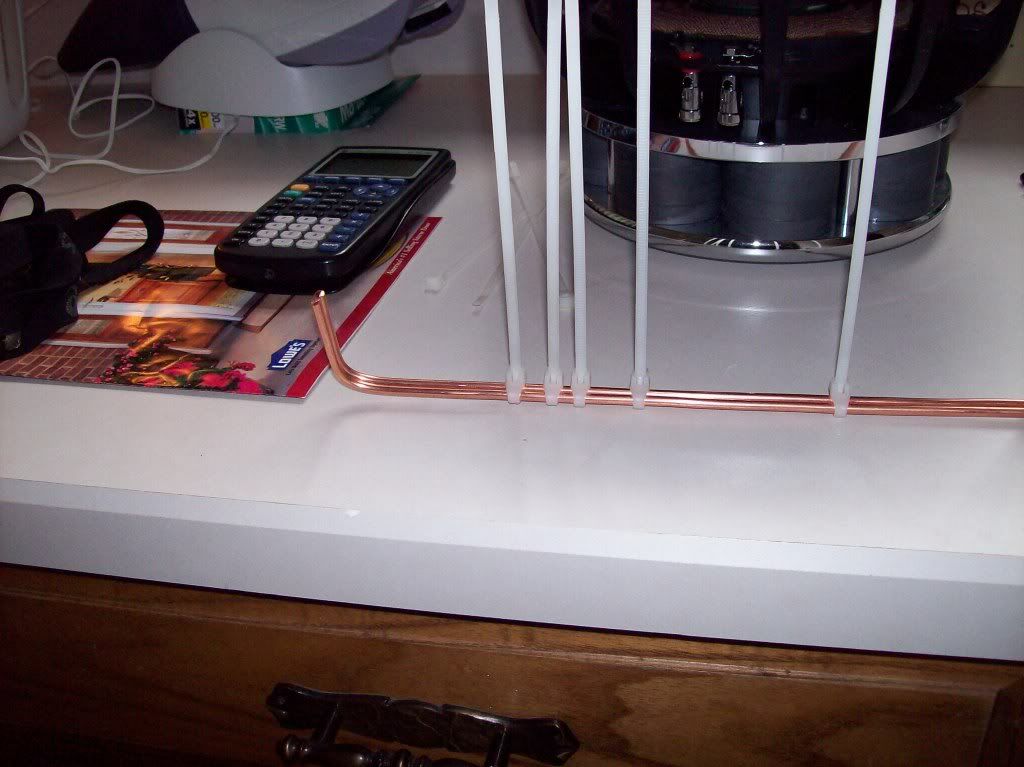
I wanted to use solid copper instead of wires. Why? Because it looks five million times cooler that's why! I needed to find a way to straighten the copper since it came rolled up. I decided to roll it between two sheets of MDF with all 145lbs of me (cross country runner) on top of it. It worked very well to my surprise!
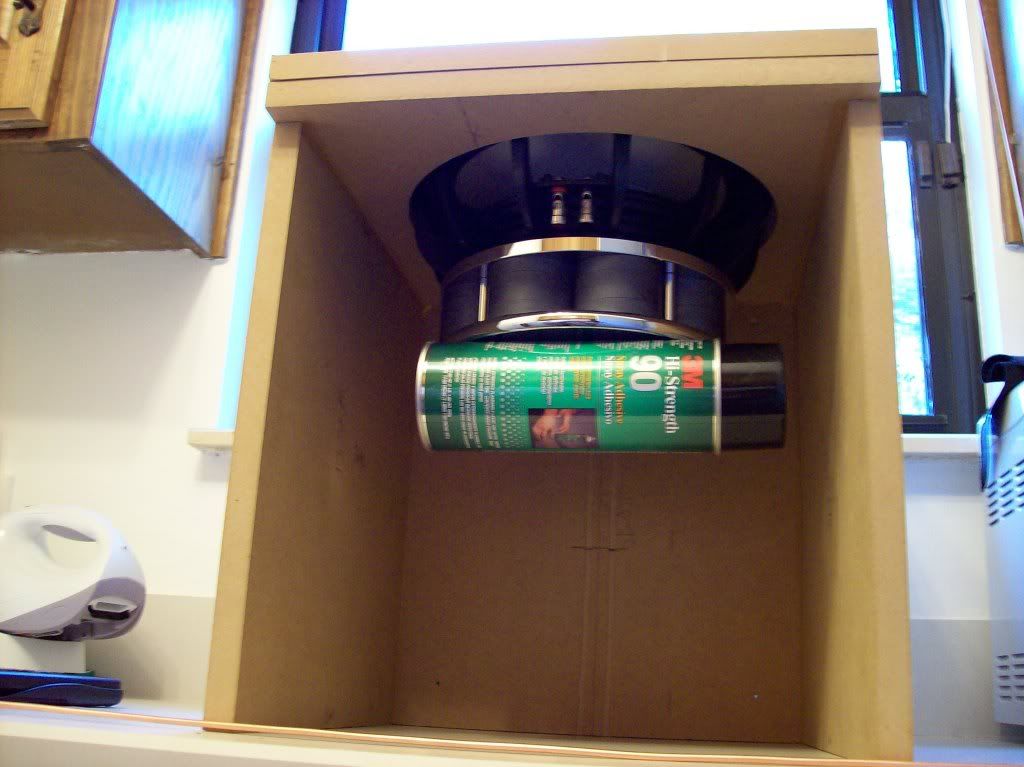
So now that my copper was straight I needed to find a way to make uniform bends so I could get around the subs' motor structure. I first zip tied the copper pieces together at a few intervals so I could bend both pieces at the same time and get both of them the exact same shape. I used a can of 3M 90 spray adhesive as a guide around the magnet. It was the perfect diameter and actually stuck to the bottom of the magnet which was great since I didn't have to hold it.
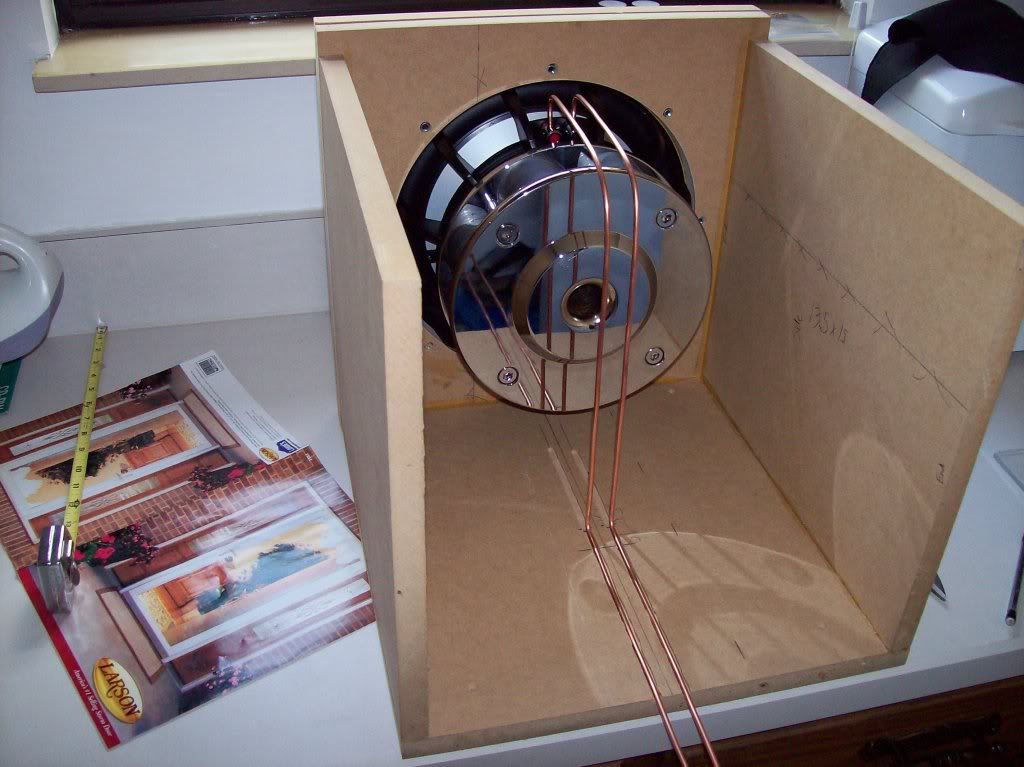
Now that I had made my bends I had to test fit to see if it works....perfect fit!
The perfect car audio installatipon website with ipod integration, mp3 navigation and aftermarket wholesale audio amplifier repair and trouble shooting subfooer enclosures for car, trucks and home theater gurus in the 12 volt industry online!
car stereo forum, automotive vbulletin, 12 volt, sub woofer, stereo troubleshooting, car audio, caraudio, audiophile, sound quality, car audio sq, SPL forum, wholesale car audio
car stereo forum, moble audio, car stereo, wholesale car audio, Home theater, and big 12 volt, amplifier, with amp, subwoofer, sound quality annd many types of sound deadening for buy car audio, and sell automotive stereo systems for cars


 Your Privacy Choices